
Skid Steer Belt Replacement: Step-by-Step DIY Instructions
Operating a skid steer under challenging conditions such as at construction sites or farms means you cannot expect your equipment to perform well if even one of its minor components is faulty like skid steer belt replacement. Two such components that quite literally keep your engine running and hydraulic systems pressurized are the drive belts and fan belts.
As you can guess, these two belt types are constantly under the intense heat, friction, and tension of the engine, and over time, they will develop cracks, glazing, or even snap. If you have heard a squealing sound coming from your hydraulic system or noticed its performance deterioration, a Skid Steer Belt Replacement is probably in order.
Skipping the middleman and doing your own Skid Steer Belt Replacement not only saves you money on the parts but also cuts the downtime of your machine to the bare minimum. Given that most skid steer models have relatively tight engine bays, this guide is prepared to lead you through the whole process of visually checking the belts, getting into the belt housing, and replacing the belt with the accuracy of a trained technician.
Top 7 Skid Steer Belt Replacement Tips:
1. Signs That You Need a Skid Steer Belt Replacement
Definitely, not every time you are about to do a complete service of the Skid Steer Belt Replacement should you go around wondering whether this one day will become today. Continuing to ignore the early symptoms of a worn belt might cause your engine to overheat and the steering together with the lift functions to suddenly stop working – two very dangerous situations on any job site.
- Loud Squealing: If the machine is emitting a high-pitched squealing on startup or during heavy lifting, it is a sign that one of the belts is slipping.
- Cracks and Fraying: Take a good look at the ribbed side of a belt, and you will most likely see cracks in depth or “chunking”, which means pieces of rubber were separated from the belt surface.
- Burnt or Shiny Sides: If the belt appears to be shiny or “burnt” on the sides, it shows that it was sliding against the pulleys and hence it is no longer performing well.
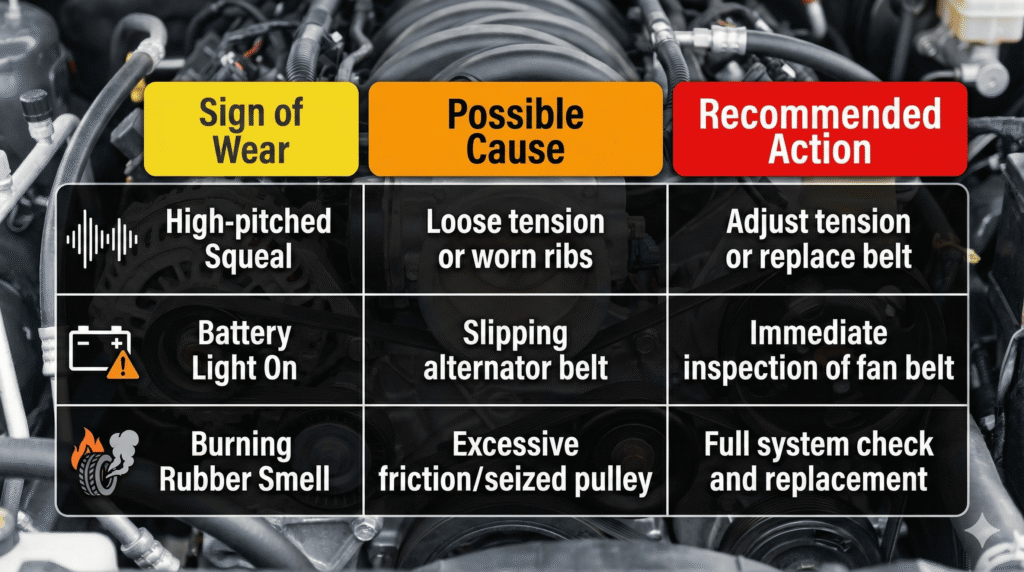
| Sign of Wear | Possible Cause | Recommended Action |
| High-pitched Squeal | Loose tension or worn ribs | Adjust tension or replace belt |
| Battery Light On | Slipping alternator belt | Immediate inspection of fan belt |
| Burning Rubber Smell | Excessive friction/seized pulley | Full system check and replacement |
2. Essential Tools and Safety Preparations
Getting ready is the most important part of any Skid Steer Belt Replacement. Since there are the engine and cooling system nearby, safety installations cannot be compromised in order to avoid burn injuries or to be crushed.
- Lock Out/Tag Out: Make sure the machine is completely turned off, the key is taken away and the “Dead Man’s Plate” or safety bar is activated.
- Cooling Time: It is a big NO to do Skid Steer Belt Replacement right after using the machine without giving the engine and radiator at least an hour to cool down.
- Tools: Have a socket set (usually size from 13mm to 17mm), a pry bar for helping with the tensioning, a torch and a new OEM-spec belt from SteerSkid ready at your hand.
3. Reaching the Drive and Fan Belt System
Skid steers have to be very nimble to fulfill their role; as a consequence, the engine compartment is often very cramped indeed. There is quite a number of things one could do to get to the belts without the need to take sensors or hoses apart and risk breaking them.
- Take off the Rear Door and Grill: First, you will gain access to the engine by opening the rear door after which the protective grill will be taken off to have a clear view of everything.
- Air Flow Clearance: On most models, to get access to the pulleys you will have to take out either the air intake boot or the fan shroud (usually the one which is attached by 13mm bolts).
- Find the Tensioner: The belt tensioner pulley or alternator adjustment bracket, which is responsible for keeping the “stretch” of the belt, can be located by finding the tensioner.
4. Getting Rid of the Old Belt
When the belt area is already opened, the real Skid Steer Belt Replacement is performed starting with the getting rid of the old damaged belt. Typically, the belt removal process goes faster when you have previously figured and marked out its “routing path”.
- Unfasten the Pivot Bolt: Grab the wrench and loosen the bolt which locks the bracket of the tensioner or alternator in position.
- Remove the Tension: To get your belt off, simply turn your adjustment bolt the opposite way or push your tensioner using a pry bar, thus creating slack in the belt.
- Check Pulleys: If you want, you may take this opportunity to test by hand how smoothly the idler and alternator pulleys rotate.
5. Putting in a New Skid Steer Belt
This part of the job has nothing to do with speed – putting on the new belt through the fan blades and around pulleys has to be very precise in accordance with the manufacturer’s schematic.
- Belt Routing: You have to start off by placing the belt on the biggest pulley (12, 13) and then continue wrapping around the alternator and water pump.
- Alignment of Ribs: Pay attention to the fact that the “V” ribs must be perfectly aligned inside the grooves of pulley after pulley in order that the belt would not skip during running.
- Prevent Turning: If at any time you notice that a belt is twisted, this will lead to instant failure so it should be corrected immediately.
6. Tensioning for Optimal Performance
Whether your Skid Steer Belt Replacement will remain a long time before the next one depends almost entirely on the meter of proper tension. On one hand, a belt that is loose will cause slipping; on the other hand, an overtightened one is likely to make the alternator and water pump internal bearings wear quicker.
- Put Tension: Move the alternator or tensioner with the help of your pry bar until you get the correct tension.
- The Rule of “Half-Inch”: Put your thumb in the longest span of the belt and press it hard. If there is hardly one-half inch of deflection, this means the belt tension is proper.
- Fix Bracket: Once the tension is set, tighten the locking bolts securely to ensure the setting does not vibrate loose.
7. Final Inspection and Testing
Before you shut the engine cover and go back to working, a test run should be part of your routine whereby you check if the Skid Steer Belt Replacement done correctly.
- Make sure everything is cleared: Picking up all the tools, rags and the old belt you left in the engine compartment so none of them get caught in the moving parts.
- Switch on the Engine: Now that the engine is running and the belt has had time to warm up, you may visually check it for any damage or misalignment.
- Look for any Vibration: Keep an eye on your belt “fluttering” and if you observe the phenomenon, it means tension adjustment is needed.
Frequently Asked Questions about Skid Steer Belt Maintenance
When is the right time to do a Skid Steer Belt Replacement?
Manufacturers recommend inspecting the belts after every 50 to 100 hours of work. A Skid Steer Belt Replacement will basically be your major maintenance act not less than 500 hours and not more than 1,000 hours (unless you are operating a machine in extremely hot or dusty conditions).
What is the reason that my skid steer belt keeps slipping even if it is new?
Generally speaking, a new belt that slips is a result of either improper tension or the pulleys are “glazed”. You can double-check that the 1/2-inch deflection rule was observed and remove any rubber residue from the pulleys using a wire brush.
Is it okay to use a generic automotive belt for skid steer?
Although it seems that such a belt would do the job, industrial skid steer belts are enhanced with very robust cords to sustain the sudden hydraulic loads and the high torque. A regular automotive belt will often snap prematurely and eventually cause engine damage.
What do I need to replace a belt on a skid steer machine myself?
The list of tools is not extensive: a 13mm and a 17mm socket or wrench set, a big flat-head screwdriver or a pry bar for tensioning, and a torch/flashlight to take a look into the engine bay great depths.
What causes overheating in skid steer engines?
In most cases, a worn or a loose fan belt is behind the overheating problem. If the belt is unable to turn the fan at the required revolutions per minute, the heat will not be shed by the radiator. Usually, a simple Skid Steer Belt Replacement is the solution to this problem.
Which one is the fan belt and which one is the drive belt?
Simply put, the fan belt powers the cooling fan first of all and sometimes the alternator as well. The drive (or hydrostatic) belt is the one that makes the transfer of power from the engine to the hydraulic pumps which then move the wheels and loader arms possible.